2025.10.29 更新
实际上 docker compose down && docker compose up -d 之后我发现只是角色表的权限被重置了,但用户表没有,这是一点。
然后就是,修改用户表的时候必须要注意,只修改对应 sign up 角色的计划,不要修改其他的,会导致用户失去一些其他权限,
步骤:
1: 进入容器
docker exec -it affine_postgres psql -U affine
2: 更新用户角色权限
注意
name的值要和feature_id的值对应,在features表中注意
user_id的值要和id的值对应,应该为reason列值是sign up的条目,在 user_features 表中
update user_features set name = 'lifetime_pro_plan_v1', feature_id = 3 where user_id = '48c432d0-f349-4539-8520-ce50fd50551b' and id = 13;
3: 更新计划信息
注意
id的值要和feature的值对应,在features表中
update features set type = 1, configs = '{"name":"Lifetime Pro","blobLimit":104857600,"storageQuota":10995116277760,"historyPeriod":25920000000,"memberLimit":1000,"copilotActionLimit":1000}' where id = 3 and feature = 'lifetime_pro_plan_v1';
最后:
4: exit
5: docker restart affine_postgres
如果只是重启容器,角色和计划信息不会被重置,但如果是 docker compose down && docker compose up -d 了,需要进入容器之后查看一下,是否变化了
# 查看用户表中所有用户对应的权限
select * from user_features;

# 查看许可证表中的配置信息
select id, feature, type, configs from features;
# 或者查看所有列
select * from features;
旧
前文:
20250817 更新:
一些不懂的操作可以看下文已经失效的,可以参考
温馨提示!数据库操作有风险,请注意备份!!!
如果更改完发现AFFiNE无法启动或者启动之后无法访问,白屏,那么就是失败了,参数可能更新了,无法更改了,或者对应的条目更改错了之类了。
# 进入数据库容器(注意数据库名称和自己是否一致)
docker exec -it affine_postgres psql -U affine

# 查看用户表中所有用户对应的权限
select * from user_features;

# 查看许可证表中的配置信息
select id, feature, type, configs from features;
# 或者查看所有列
select * from features;

# 给指定用户进行提权
# name和feature_id对应许可证表中的lifetime_pro许可证
# user_id对应用户表中的自己这个用户,一般前面的id为1就是了
update user_features set name = 'lifetime_pro_plan_v1', feature_id = 16 where user_id = 'e40b5e7f-2e25-4c86-aa7f-c2a9f32565be';
# 执行后出现UPDATE 1说明修改成功

# 修改lifetime_pro_plan_v1配置增加人数和历史版本数
# 注意最后面的id是对应的许可证表中lifetime_pro_plan_v1的id
update features set type = 1, configs = '{"name":"Lifetime Pro","blobLimit":104857600,"storageQuota":10995116277760,"historyPeriod":25920000000,"memberLimit":1000,"copilotActionLimit":1000}' where id = 16 and feature = 'lifetime_pro_plan_v1';
# 执行后出现UPDATE 1说明修改成功

# exit退出数据库,重启数据库
docker restart affine_postgres
效果如图:

需要注意的是,提权是永久的,但是修改配置,每一次 docker compose down && docker compose up -d 之后都会失效,需要重新进容器执行一次。
本文:
2025.8.8,版本0.23.3稳定版,实测依然可以改。
# 进入数据库容器(注意数据库名称和自己是否一致)
docker exec -it affine_postgres psql -U affine
# 查看所有用户对应的权限
select * from user_features;
如图所示:
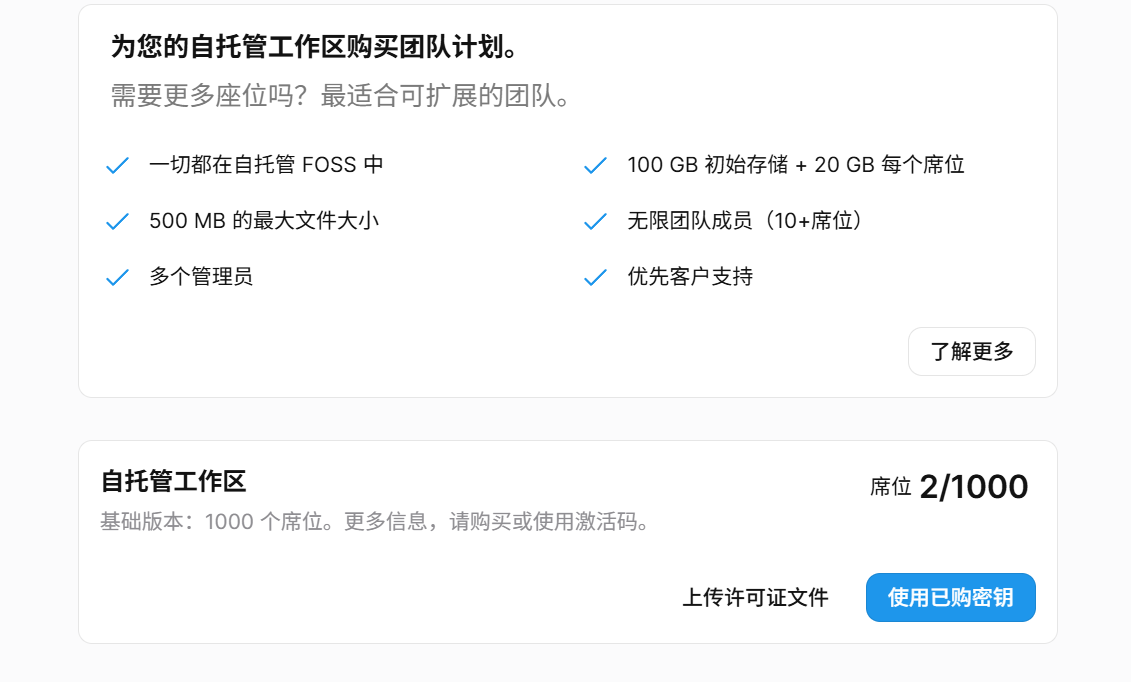
一般情况下ID为1就是就是自己对应的管理员的那个第一个账户。

这里可以看到自己账户的许可证是 free_plan_v1,可以查看一下所有许可证的列表:
# 查看许可证对应的内容
select id, feature, configs from features;
# 出现END之后按键盘的Q退出该表
如下所示:
id |       feature        |                                                                    configs
----+----------------------+------------------------------------------------------------------------------------------------------------------------------------------------
 14 | pro_plan_v1          | {"name":"Pro","blobLimit":104857600,"storageQuota":107374182400,"historyPeriod":2592000000,"memberLimit":10,"copilotActionLimit":10}
 16 | lifetime_pro_plan_v1 | {"name":"Lifetime Pro","blobLimit":104857600,"storageQuota":1099511627776,"historyPeriod":2592000000,"memberLimit":10,"copilotActionLimit":10}
 17 | team_plan_v1         | {"name":"Team Workspace","blobLimit":524288000,"storageQuota":107374182400,"historyPeriod":2592000000,"memberLimit":1,"seatQuota":21474836480}
  4 | unlimited_workspace  | {}
  5 | unlimited_copilot    | {}
  6 | ai_early_access      | {}
  7 | administrator        | {}
 13 | free_plan_v1         | {"name":"Free","blobLimit":104857600,"storageQuota":107374182400,"historyPeriod":2592000000,"memberLimit":10,"copilotActionLimit":10}
  3 | early_access         | {}
(9 rows)
我已经修改过一次了,所以有些内容和默认的可能不太一样,需要注意一下。
解释一下 config 中部分参数的含义:
- name:许可证的名称,有免费版,Pro版,终身Pro版
- blobLimit:上传单个文件最大大小,104857600单位字节B,换算过来就是100M
- storageQuota:初始存储的空间大小,107374182400单位字节B,换算过来就是100G
- historyPeriod:文档历史保存时间,2592000000单位毫秒ms,换算过来就是30天
- memberLimit:团队最大成员数,单位人
- copilotActionLimit:应该是和AI有关,可能也是限制人数,必须等于memberLimit的值
- seatQuota:每个成员数所扩展的存储空间,21474836480单位字节B,换算过来就是20G
备注:整个团队的空间 = 初始空间 + seatQuota * 人数
然后就是给指定的用户进行提权,也就是上图中的 feature_id 可以看到普通用户默认是13和7,对应的就是 free_plan_v1 和 administrator,来进行权限的添加:
先再查询一下用户表,复制一下索引ID和用户ID,避免搞错:
# 执行用户表查询:
select * from user_features;

# 结果示例:
 id |               user_id                | feature_id |   reason   |         created_at         | expired_at | activated |     name      | type
----+--------------------------------------+------------+------------+----------------------------+------------+-----------+---------------+------
  1 | e40b5e7f-2e25-4c86-aa7f-c2a9f32565be |         13 | sign up    | 2025-02-19 12:51:55.219+00 |            | t         | free_plan_v1  |    1
  3 | 59e5d0e4-96bd-4b45-aef7-3cd2faeb1666 |         13 | sign up    | 2025-02-19 13:07:22.216+00 |            | t         | free_plan_v1  |    1
  2 | e40b5e7f-2e25-4c86-aa7f-c2a9f32565be |          7 | Admin user | 2025-02-19 12:51:55.227+00 |            | t         | administrator |    0
(3 rows)
这里可以看到,用户ID为 e40b5e7f-2e25-4c86-aa7f-c2a9f32565be 有两条,这两条分别对应的是不同的权限,然后根据对应的ID来配置添加语句,增加一个权限:
# 更改对应用户的feature_id来进行提权
# 需要注意的是用户ID,许可证ID一定要按照参数顺序!且必须一一对应!
# 第一个参数id一定要是上表里没有的,且一定要按顺序增加!比如我表里到3,那么新增加的这一条一定要是4!
# 必须要按照自己的数据库来进行更改对应的参数!
# 其他几个参数不必要,默认即可
insert into user_features (id,user_id,feature_id,reason,activated) values (4,'e40b5e7f-2e25-4c86-aa7f-c2a9f32565be',16,'sign up','t');
执行完毕之后如图:

顺手再加两个权限吧:
# 尤其要注意对应的ID!
insert into user_features (id,user_id,feature_id,reason,activated) values (5,'e40b5e7f-2e25-4c86-aa7f-c2a9f32565be',5,'sign up','t');
insert into user_features (id,user_id,feature_id,reason,activated) values (6,'e40b5e7f-2e25-4c86-aa7f-c2a9f32565be',4,'sign up','t');
然后更新一下名称:
# 尤其要注意对应的ID!id是用户表中的索引ID,feature_id是对应条目中的许可证ID!
UPDATE user_features SET name = 'lifetime_pro_plan_v1', type = 1 WHERE id = 4 AND feature_id = 16;
UPDATE user_features SET name = 'unlimited_copilot', type = 1 WHERE id = 5 AND feature_id = 5;
UPDATE user_features SET name = 'unlimited_workspace', type = 1 WHERE id = 6 AND feature_id = 4;
输入 exit 退出数据库,输入 docker restart affine_postgres 重启数据库生效。
接下来是修改成员数和空间大小限制,重新进入数据库容器:
# 进入数据库容器(注意数据库名称和自己是否一致)
docker exec -it affine_postgres psql -U affine
查看一下所有许可证的列表:
# 查看许可证对应的内容
select id, feature, configs from features;
# 出现END之后按键盘的Q退出该表
然后修改对应的值:
# 修改成员数限制,注意对应的参数对应的值,最后的id是要修改的许可证的列表前面对应的id
update features set configs = '{"name":"Lifetime Pro","blobLimit":104857600,"storageQuota":10995116277760,"historyPeriod":25920000000,"memberLimit":1000,"copilotActionLimit":10}' where id = 16;
# 输入exit退出数据库
对应参数的值可以看上文,最后重启数据库生效。
docker restart affine_postgres

